The neck on this example was made of a single piece of maple with a walnut strip inlaid, No truss rod is needed on a neck this short, I would add a strip of carbon rod on the Tenor model though.
My advice for a first instrument would be to buy a mandolin or uke fingerboard to fret as maple is challenging for the beginner being softer than the rosewood or ebony and harder to seat the frets evenly.
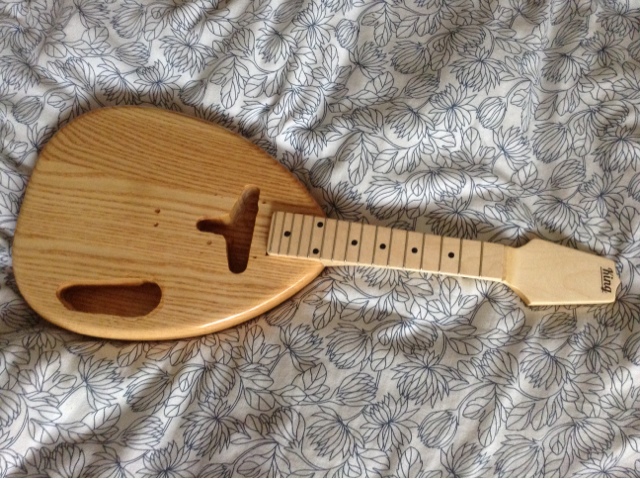
These are the neck options for this teardrop body:
Soprano neck: 13.7/8" standard soprano, compact, great for chords. can be strung as a Mandolin also
Concert neck 15" scale , more space for fingers
Tenor neck: 17" scale, feels like an electric guitar, easy to bend, thinner strings
Slotted rosewood fingerboards are available from Stewmac for soprano Ukulele(sold as Mandolin fretboard)
Tenor Ukulele fretboards are available ready slotted from Allen Luthiery supplies
Choose to make the neck to fit the playing style or the scale length you are familiar with.
When making out the neck always mark on the Centre line and always work to it.
I made my own black dots using spare pick-guard material but you can buy position markers. The side dots are sold in a long length that you install and cut off as you go, don't try to cut them off before. I used epoxy to glue the dots in place, then sanded and sealed the fingerboard with shellac.
For frets I use low profile mandolin fretwire from stew mac in the USA. if you mark the frets on yourself using my measurements always measure from the nut for each fret first. And double and triple check. I used an adjustable sliding bevel to mark my frets and as a guide for the fret slotting saw (again from stew mac)
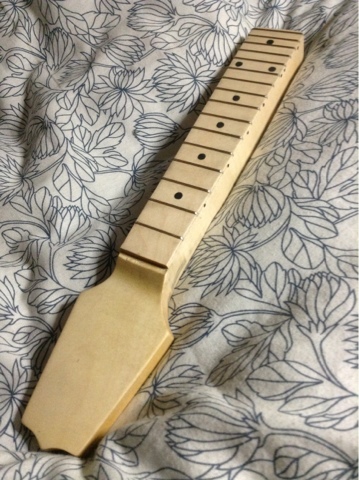
Once the fret slots are sawn a triangle file is used to file the edges of the slot to aid future removal(future re-fret luthiers will thank you) and the frets pressed or hammered home, hammering from the centre outwards is best, some people drop a little glue into the slot to fill any gaps(no nails acrylic glue or Titebond) trim and sand the edge of the frets to the neck and the Shape the neck itself. The pictures here give a guide, I do it by feel these days. There are videos on fret levelling and polishing, Crimson Guitars have a a great tutorial section for free and sell the tools to do the job too!

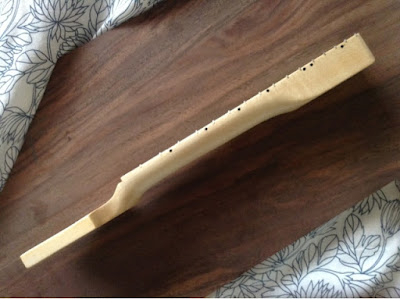

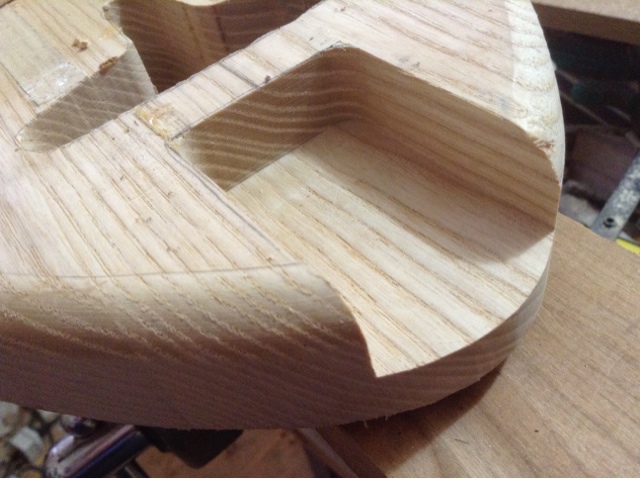
With the neck shaped a simple router jig is used to rout out the neck pocket. Its basically a board made from mdf or perpsex that acts as a guide for the bearing guided cutter. The cutters used are listed in the pdf manual with the plans. Always rout to fractionally just before the line so you have a few tenths of a mm of adjustment to sand or scrape off.
The fit should be enough to hold the neck in place even without the screws but loose enough for easy dissembling.


My advice for a first instrument would be to buy a mandolin or uke fingerboard to fret as maple is challenging for the beginner being softer than the rosewood or ebony and harder to seat the frets evenly.
These are the neck options for this teardrop body:
Soprano neck: 13.7/8" standard soprano, compact, great for chords. can be strung as a Mandolin also
Concert neck 15" scale , more space for fingers
Tenor neck: 17" scale, feels like an electric guitar, easy to bend, thinner strings
Slotted rosewood fingerboards are available from Stewmac for soprano Ukulele(sold as Mandolin fretboard)
Tenor Ukulele fretboards are available ready slotted from Allen Luthiery supplies
Choose to make the neck to fit the playing style or the scale length you are familiar with.
When making out the neck always mark on the Centre line and always work to it.
I made my own black dots using spare pick-guard material but you can buy position markers. The side dots are sold in a long length that you install and cut off as you go, don't try to cut them off before. I used epoxy to glue the dots in place, then sanded and sealed the fingerboard with shellac.
For frets I use low profile mandolin fretwire from stew mac in the USA. if you mark the frets on yourself using my measurements always measure from the nut for each fret first. And double and triple check. I used an adjustable sliding bevel to mark my frets and as a guide for the fret slotting saw (again from stew mac)
Once the fret slots are sawn a triangle file is used to file the edges of the slot to aid future removal(future re-fret luthiers will thank you) and the frets pressed or hammered home, hammering from the centre outwards is best, some people drop a little glue into the slot to fill any gaps(no nails acrylic glue or Titebond) trim and sand the edge of the frets to the neck and the Shape the neck itself. The pictures here give a guide, I do it by feel these days. There are videos on fret levelling and polishing, Crimson Guitars have a a great tutorial section for free and sell the tools to do the job too!


With the neck shaped a simple router jig is used to rout out the neck pocket. Its basically a board made from mdf or perpsex that acts as a guide for the bearing guided cutter. The cutters used are listed in the pdf manual with the plans. Always rout to fractionally just before the line so you have a few tenths of a mm of adjustment to sand or scrape off.
The fit should be enough to hold the neck in place even without the screws but loose enough for easy dissembling.
Next: The Finish
No comments:
Post a Comment